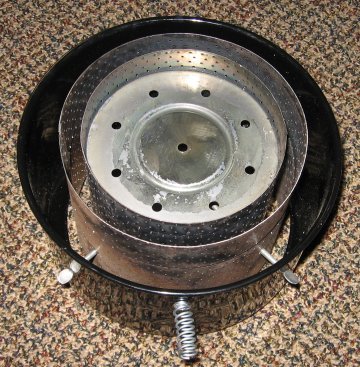
An "flame spike"
can be caused by too high a wick in a multi-wick stove
as well as an air leak. To determine the problem,
grab the wire handle (see photo above) on the catalytic
converter and move it slowly from side to side while
watching the flame. If the flame spike does
not move, the cause is a wick too high.
Remember the location (10:30, 3:00 o'clock, whatever),
cool the stove, remove the catalytic converter, and
trim down the offending wick.
If the flame
spike moves with the catalytic converter, the cause
of the flame spike is an air leak. That is easy
to fix. Place a new sheet of sandpaper of 120 to
150 grit on a flat surface, like a Formica
countertop. Place the catalytic converter base
down on the sandpaper close to you and hold an edge of
the sandpaper down against the countertop. Then
gently stroke the catalytic converter away from you,
one stroke!, while keeping the catalytic converter as
flat as possible. Lift the catalytic converter
and return it to the near edge, then make another
stroke. Now you can examine the bottom edge of
each cylinder. The shiny spots were high spots
that were sanded down. The dull places are too
low and will cause an air leak. Repeat the
sanding strokes until both cylinders are shiny rings
all the way around. Bingo, no air
leak.
That whole
operation takes less than 10 minutes, and your kerosene
stove will now burn properly. Now the wicks can
be raised higher, producing more heat without a flame
spike causing sooting on your pots and
pans.
OBTAINING AN EVEN WICK HEIGHT (MULTI-WICK
STOVES)
All kerosene
stoves depend upon an even flame height for maximum
efficiency. If there is a "flame spike" caused by
a wick which is too high, the maximum heat output of
the stoves is limited because that one flame spike soot
up any cooking utensil if it impacts the base of the
pot or pan. When all the wicks are exactly the
same height, the flame and will be even all the way
around, so maximum heat output can be obtain and
minimum simmering temperatures vastly easier to
control.
Every multi-wick
stove has raised guide ribs on the inside and outside
of the wicks. Those guide ribs indicate the
maximum height of the wicks when fully
raised. When wicks need trimming, or with new
wick installation, the wicks are pulled up with pliers
to be slightly above the height of the guide
ribs. A sturdy pair of scissors is then laid
across the guide ribs and the top of each wick is
snipped off. There are times when that method
does not work well - too enclosed a space to snip
evenly, scissors not sharp enough, etc. In this
case, burning the wicks down to a level works extremely
well. The wicks are cotton so they will burn when
dry. Remove all fuel from the tank. Old
wicks will be wet with fuel. If adjusting new
wicks, put some fuel in the tank, let the wicks absorb
it, then empty the fuel tank. Adjust the wicks so
the lowest wick is just barely above the wick tube,
light all the wicks, and reassemble the stove. As
the last of the fuel is burnt from the wicks, the wicks
themselves will burn, which will burn off any carbon
deposits. The wicks will burn down to the top of
the wick tubes - and they will be nice and even in
height, perfect for the next use of the stove. The
wicks are supplied long precisely so they can be
trimmed down repeatedly, so this process is not
wasteful.
Because kerosene
stoves with catalytic converters burn efficiently and
clean, I adjust the wick height at night so I can see
the flame height. And because burning cotton has
a distinctive aroma, I do this work in the
greenhouse. A garage or any well ventilated area
without a strong draft would work just as
well.
STORAGE
Be sure to store
the stove "dry," empty of fuel, to avoid any
condensation in the fuel tank. After the fuel is
emptied from the tank, light the wicks, assemble the
stove, and let it burn for a half hour or so until all
fuel is out of the wicks - the flame will go down
demonstrably. Lower the wicks while peeking under the
catalytic converter so that just a little flame is
showing (perhaps 1/8" or so of wick exposed), then
re-seat the catalytic converter. In an hour the
wicks will have burned down even with the top of the
wick tubes and be ready to use again.
At this point,
the stove should be taken apart and given a nice coat
of polish. Normal liquid auto polish should be
applied to all surfaces, inside and out. All it
takes in about 15 minutes, and the pores of the enamel
are filled, the stove will not rust in storage, nor
will spilled food cause any stains.
The
catalytic converter should be examined. If dirty
or sooty, the guide rods should be removed and the
cylinders washed in hot, soapy water until clean.
If not too bad, a thin brush can be employed to brush
off the cylinders. If the stove is to be
stored indoors in a dry place, nothing else need be
done to the catalytic converter. If, however, the
stove is to be stored in a garage or anyplace with a
high humidity, the cylinders need to be oiled to
prevent rusting.
Finally, store
the stove in a tight fitting box, and seal the
box. The next time you need the stove it will be
absolutely ready to use. Just fill with fuel,
wait a half hour for the wicks to suck up fuel, and
light it.


