|
SITE
INDEX
QUICKENING
NEWS
PREPARATIONS
1.
Food
2.
Manna
Meals
3.
Water
4.
Sanitation
5.
Medical,
health
6.
Kerosene heaters and cookers
7.
Lighting
8. Wood
cooking and heating
9. Communi-cations
10. Essential
Tools
11. Home
built items
12.
Electrical; generators
and power
13. War
preparedness
14.
Gardening
SITE
INDEX
Miles Stair's SURVIVAL
SHOP
HOME
RADIATION
INDEX & JET STREAM
PROPHECY
COMMENTARY
BY MILES
BOOKLETS
BY MILES
GUEST
SUBMISSIONS
PHOTO
INDEX
LINKS
SITE
INDEX
Miles Stair's SURVIVAL
SHOP
|
|

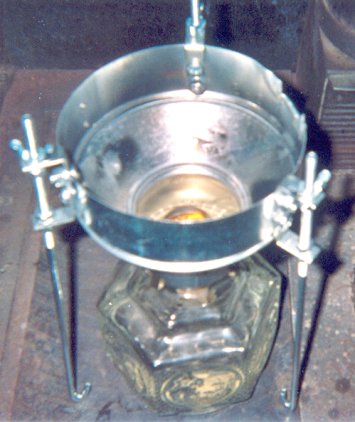
Kero
Cooker Boils Beans
by
New England Gardener
In experiments with baking bread in
electric Crock-pots or Slow-cookers, I also tried to bake
beans. This did not work because these pots wouldn't boil
the beans hard enough to soften them. In the winter, on
our Wood Cook
Stove, it would be easy to boil the beans on top of
the range, and then bake them in the oven. If you plan to
use a wood heating stove for cooking, make sure you can
get the pan hot enough to bring the beans to a steady
boil. In the summertime, kerosene is a much better choice
for non-electric cooking.
The Slow-cooker recipes all tell you
to soak beans overnight, and then boil on a stovetop
until softened. This takes us about an hour and a half.
Only then, do you season them and put them into the
Slow-cooker. I experimented to get around this step, but
even when I soaked the beans for 24 hours, simmered them
in the Slow-cooker all day, and baked them over night,
they still came out like bullets. This little kerosene
cooker solves the problem by easily boiling the beans,
and it can to be turned down to simmer and even "bake"
them. I included it in the experiment for my article,
"Baking Bread
Without an Oven". It baked corn bread in much less
than half the time of the electric Crock-pots, and it
will bring water or beans to a rolling boil. This is a
very small stove, and uses a 4 cup pan over a common oil
table lamp, with a 7/8 inch wide wick. This lamp was
meant for a glass chimney 3 inches in diameter, a common
size, so the bottom of the cooker fits snugly over the
burner. Other 3 inch lamp burners with different wick
sizes are available, if you want more or less heat. My
guess is that a inch wick would be better for more
simmering. No modifications are made to the lamp at all,
so you can just put the glass chimney back on, and use
the lamp for lighting again.
The hot exhaust gasses from combustion
are guided up the sides of the pan for increased
efficiency. It was also made from off the shelf
components. I only had to drill six inch holes, and
bolt it together. The body of the stove is a flue adaptor
for 3 inch pipe to 6 inch pipe. It was only a few dollars
at a good plumbing supply house. Some hardware stores
would have it too. The overall length of mine is 4.75
inches long. I used three extra long truck battery hold
down clamps as legs. If your lamp is shorter, the regular
length ones may be long enough for you. These are a piece
of inch diameter rod with a hook on one end. On the
other end, the last 4 inches is threaded. Mine are a foot
long. I got these from www.tractorsupply.com
, but any auto parts supplier who serves truck or farm
tractors should have the long ones. The regular length
will be even easier to find.
To attach the legs, six "L" brackets
from the hardware store were used. Each side of the "L"
has a inch hole, and is 1 inch long. For stability, I
wanted a slight outward taper to the legs, so I bolted
the upper brackets on the inside of the 6 inch flue, and
the lower brackets on the outside, with -20 bolts with
lock nuts. The lower three "L" brackets are secured with
bolts long enough to support the cooking pan over the
flame. Each leg is adjustable in height, and secured by
-20 nuts above and below each "L" bracket.
Finding the right size pan was a
little harder. I needed a 5 inch diameter pan, but since
I also wanted to bake bread or beans in it, I chose a
stainless steel pan with a thick aluminum plate on the
bottom to help distribute the heat from the flame. This
pan had a handle, so I had to notch out the side of the
flue for that. For simply heating food or water, a thin
aluminum pot would be fine, but I think baking a quart of
beans or a small round loaf of bread, is much more
useful. It is important to remember that without
refrigeration, we will need to cook food in quantities we
can eat up quickly, especially in the summertime.
MATERIALS LIST
One Flue pipe size adaptor, 3 inch to
6 inch size, Three 12 inch long battery hold downs, Six
1X1 angle brackets with a inch hole on each side, Three
-20 by inch long bolts, Three -20 bolts the length
needed to support your pan, Eighteen -20 nuts, Six
inch lock nuts.
NEW ENGLAND
STYLE BAKED BEANS
Soak two cups of dry beans overnight
in six cups of water. If you have hard water, add 1/8th
teaspoon of baking soda to the soaking water. In the
morning, drain and cover with fresh water, and boil the
beans until they are as soft as you like. About an hour
and a half of simmering after it has reached a good boil.
With a large slotted spoon, move the beans to the baking
container, or drain off the cooking water and save it.
Add cup of Molasses, 1 teaspoon of dry mustard and one
half teaspoon of ground ginger. Stir together, and then
add just enough of the water the beans boiled in to
cover. Keep some of the rest to add later as needed. Bake
until suppertime. Salt pork, ham or bacon may be added
for flavor. Served with corn bread, it is a very hearty
supper.
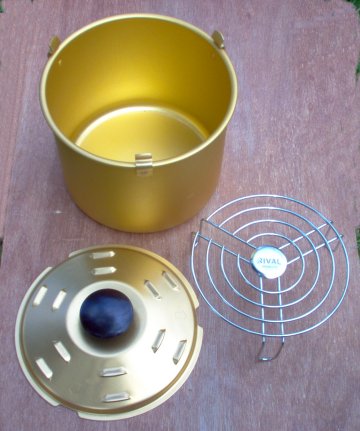 |
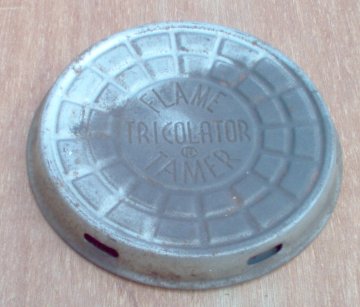
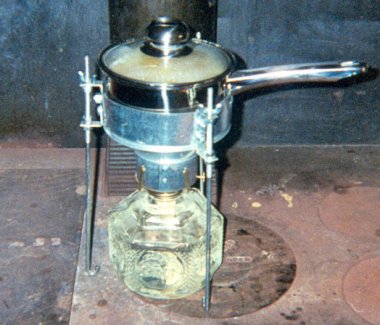
At left, a small
Bread'n'Cake pan with insert rack.
At right, a
"Tricolator" Flame Tamer, which dissipates excess
heat through the vent holes in the
side.
Click on the
photos to enlarge.
|
 |
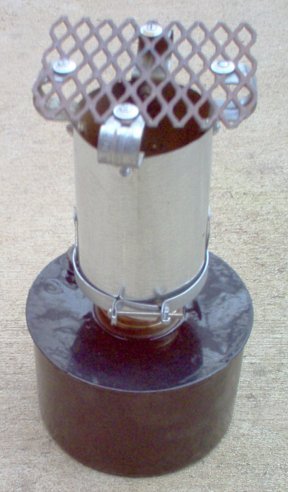 |
Note from
Miles: New England Gardener's photos will be added
later. At left is a photo of a small
kerosene stove I made from a P & A brooder
house heater. This little stove uses a 1
1/2" wide flat wick and produces enough heat for
slow cooking. To lower the cooking
temperature, the "Tricolator" above right can be
placed on the expanded metal top. For use
in windy conditions, a 2' section of 8" stovepipe
is placed over the entire assembly after lighting
and adjusting the heat output. A series of
1/2" holes are drilled around the stovepipe 3"
above the bottom to admit combustion oxygen, and
a bail handle is attached to the top to make it
easier to remove the hot stovepipe. The
chimney was made from a 4" stovepipe and is 3
5/8" in diameter. For more on mini kerosene
heaters, see
www.milesstair.com/Mini_Kerosene_Heaters.html
.
|
|
|
|
