|
A guide to self reliant living |
||||||||||||||||
|
6. Kerosene heaters and cookers
12.
Electrical; generators
Miles Stair's SURVIVAL
Miles Stair's
SURVIVAL
|
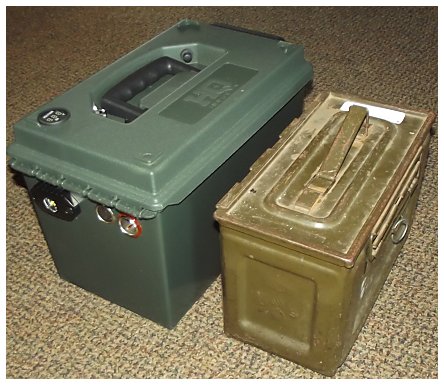
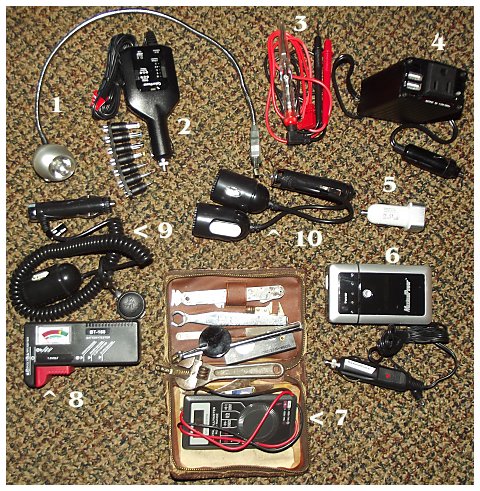
Making a Solar + Battery + Box If the electric grid went down in an hour and stayed off, what would you do for electricity to power radios, small lights and recharge all of the little convenience items we use daily? How long would your laptop and cell phone operate? Sure, we have battery backup for communications gear, but how do the batteries get recharged? A solar panel works well, but there is a need to store electricity generated during the day for use when the sun is not shining. Many small items require a long recharge period at a very low amperage draw rate so even a modest battery has the storage capacity to recharge their batteries while also powering a radio or other appliance. Many of us have small solar chargers and all the bits and pieces needed for emergency use, but are they all where we can find them when they are needed? Are all those parts truly portable? For those reasons and others I decided to build a self-contained solar battery box. That one box had to hold a small battery, folding solar panels, lights, and all the small items required: a 12 volt multimeter, 12 volt reducer to 3, 6 and 9 volts to recharge small appliances, 12v extension cord and splitter, and of course a spare world band radio. The box I used was a 50 caliber ammo box, plastic, which I got from Sportsmansguide.com. It is actually larger than a military metal 50 cal ammo can, measuring 14 1/2'' long, 8'' wide and 9'' tall. And I needed all that space. The strong plastic box was perfect for wiring as they are easily drilled for mounting switches, gauges and 12v lighter sockets.
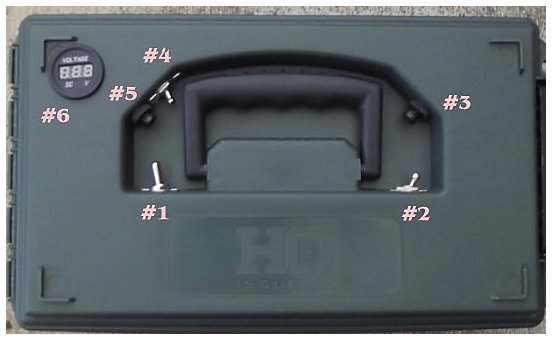
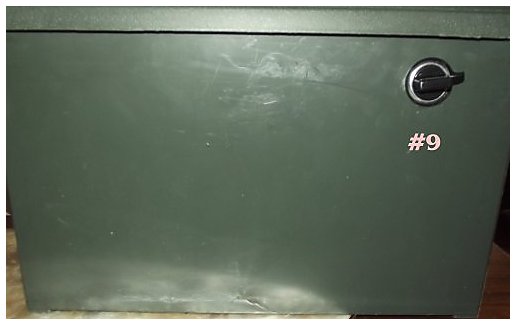
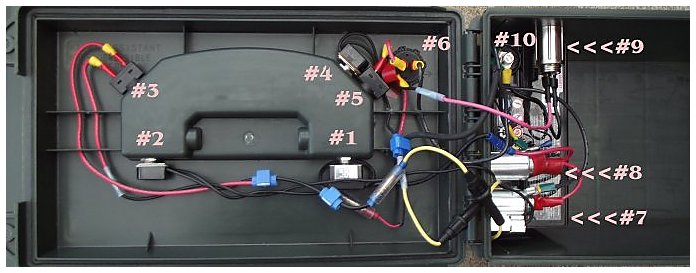
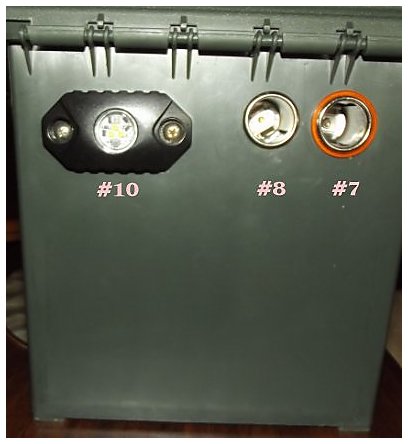
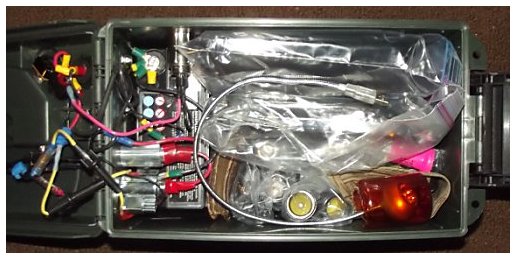
I wanted to make the battery box safe to store and carry, so the switches, gauges and sockets had to be recessed: The recesses in the lid made that very easy as I mounted the switches sideways. The numbers indicate the function of each switch, gauge and socket, both from the outside of the box (above) and from the inside of the lid (below). Hot wires (+) are red whenever possible and the blade connectors are covered with red electrical tape for safety. The ground wire terminals are covered with green electrical tape. Those colored connectors help keep things straight in the event there is a need to change or repair the wiring. Note how all of the blade connectors in the photo below, left, are flat in the lid - none point downward where they could be damaged or make contact with anything in the box when the lid is closed. #1. Main power switch to open circuit from the battery to the two lighter sockets at the end (#7 and #8). There is a 10 amp Buss fuse in the line from the + terminal on the battery to the the switch. #2. This switch turns on the 500 lumen LED light in the end of the box (#10). This light is 9 watts, and therefore draws 0.75 amps, a bit much but plenty of light for emergency use. 3. This is a ''momentary switch'' which only passes power through it when depressed. It lights up the bezel around lighter socket #7 to verify that the main fuse is not blown. If using this circuit (sockets #7 and #8) to plug in a solar charger, there would be no way of knowing if the fuse was blown and the battery NOT charging and thus wasting valuable hours of sunlight! 4. Switch #4 turns opens a second fused circuit to socket #9 on the side of the box. A solar panel can be plugged into this socket while sockets #7 and #8 are being used to charge small appliance batteries, recharge a laptop or cell phone, etc. 5. Another ''momentary switch'' which activates the LED voltage meter (#6) for the battery. As a safety indicator, there is a fuse in the line before the switch and thence lighter socket #9, so that circuit can be tested by checking the voltage: if the LED volt meter does not light up, the #9 socket will not be connected to the battery so a solar charger would not be charging the battery. 6. Voltmeter 7. Lighter socket with lighted bezel. 8. Lighter socket. 9. Lighter socket on separate fused circuit than #7 & #8. 10. LED, 500 lumen. If you look closely (click on a photo to enlarge it) you will see that I drilled through the ribbed bracing in the lid and routed wires through those holes so no wires droop down when the lid is closed, preventing them from snagging on anything inside the box. The battery I chose is a 13 amp Hawker battery. It fits perfectly in the box, sideways, under the switches and sockets. You can see it in the photo above looking under items #7 through #10. WHAT IS IN THE BOX
EVERYTHING PACKED IN THE BATTERY BOX
MORE DETAILS ON THE ACCESSORIES IN THE BOX Without all the accessories a solar charger becomes a single-use 12 volt battery charger. With the accessories virtually any small battery-powered item can remain useful well into the future. Almost any small radio, razor, flashlight, power tool, etc, can be charged no matter how restricted the amps it uses and thus requiring a long recharge time. That latter element is important because some batteries require 12 or more hours to fully charge: the 13 amp battery in the battery box can easily charge such items while also providing the juice necessary to run small LED lights at night, for example.
CALCULATING WHAT THE BATTERY BOX CAN POWER Watts is generally defined
as the amount of power (or energy) an appliance uses
(consumes) when operated at its maximum capacity for 1 hour .
Amps on the other hand is defined as how much energy an
appliance draws, or the rate of energy that flows through wire
when an appliance is used for 1 hour. Finally, volts is what
energizes the appliance or it is the force that pushes
electricity through wire to the appliance. You can determine
power characteristics of an appliance if watts rating is not
provided, by the following equation: V (Volts) X A (Amps) =
Watts (Ohm's Law) MAKING IT REAL The ''real world'' output from a solar panel being about 40%, a 28 watt panel will produce 11 watt/hours and a 14 watt panel will produce 5.6 watt/hours on a sunny day in the summer. The math gets really fuzzy for real output because of haze or clouds, the exact orientation of the solar panel facing the sun at all times, and a lot of other variables including the angle of the sun at various times of the year. So what follows is only a guideline and not precise figures that can be depended upon under all conditions at all times. Getting 10Wh of power stored in a winter day or maybe 30 or 50 Wh on a nice summer day is not to be sniffed at. My laptop requires 4.82 amps input and recharges in about an hour. My 13 amp hour Hawker battery could recharge the laptop battery once and be considerably discharged. However, my 28 watt solar panel will produce about 2 amp/hours of power and can be combined with my 14 watt solar panel produces about 1.0 amp under real-world conditions on a perfect sunny day in summer. They can be combined to produce 3.0 amps per hour for a maximum of perhaps 8 hours on summer days (plus lesser power when the sun is not high overhead). So, if the two solar panels are combined they will produce in theory 3 x 8 = 24 amps of reliable power on sunny days. That means the laptop battery can be charged while the 13 amp Hawker battery is also being charged! On cold winter days the available bright sunlight is about 4 hours a day (subtracting for an occasional cloud as well), or an output of 10 amp hours of daily charging. Even in the winter the two solar panels could keep the laptop charged, and as it does not have to be recharged every day, there would be sufficient solar power available to charge all the small rechargeable appliances we all use so often because I was being very conservative in the amount of generated amperage from the solar panels. Commonly listed small items and amp usage.
CHARGING FLASHLIGHT BATTERIES I have a Tenergy TN190 battery charger which can utilize 12 volt input power to charge AAA, AA, C, D and 9 volt batteries, with a maximum discharge current of 400mA for all but the 9 volt battery. The time required to charge the batteries is listed as: Battery: Battery capacity: Charging Time:
A milliampere-hour (mAh) is one-thousands of an amp hour. 400mA for 4 hours is 1600 mAh, or 1.6 amp/hours. A 14 watt solar panel by itself will power the flashlight battery charger and recharge four (4) flashlight batteries in less than 4 hours of sunlight, leaving more hours of sunlight to charge the Hawker main battery or power other appliances. Even on cloudy days in the winter the 14 watt and 28 watt solar panels combined should produce enough power for all that with some reserve. PARTS AND PIECES USED TO ASSEMBLE THIS SOLAR BATTERY BOX: From Amazon in April, 2016:
From eBay:
From SportsmansGuide.com
|
|
||||||||||||||

